Friday, June 18, 2010

Review: NYX Tinted Lip Spa Swatches on lips

Hi guys! My NYX haul from Cherryculture.com arrived a few days ago!!! I'm a newbie to the line - after seeing it everywhere with huge comparisons drawn to MAC (right up to the stylish black packaging)...I couldn't resist!

Again, Summer is here and my lips are in desperate need of some TLC!

*~REVIEW~*

NYX Tinted Lip Spa

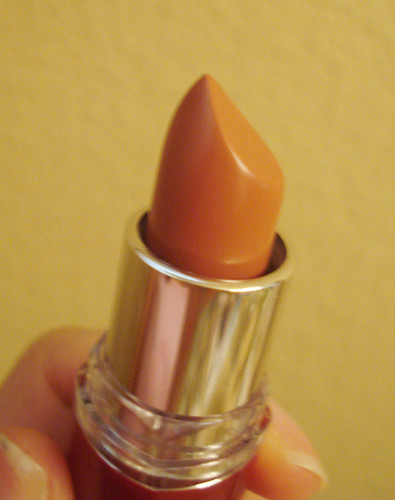
The lids are clear so you can see the color right underneath!
NYX lip spa caps

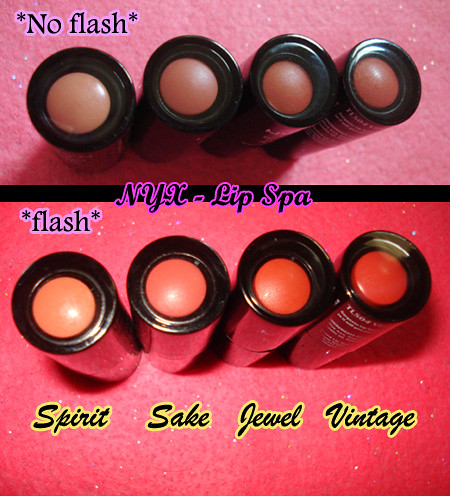
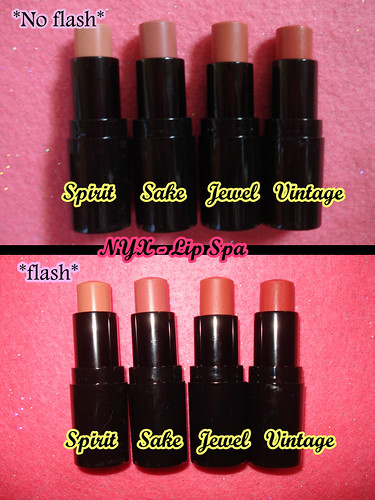
Here they are all swiveled up - they look pretty drastically different with/without flash
NYX lip spa open

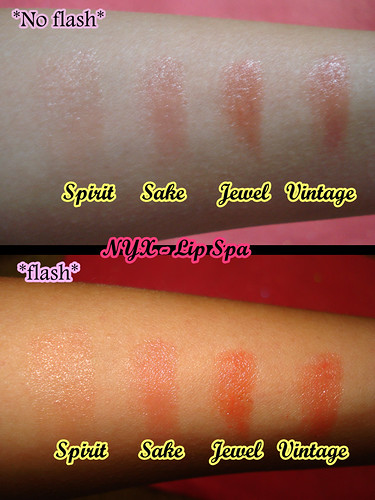
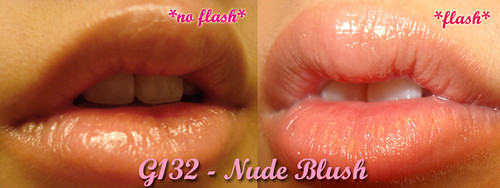
And swatched on my skin with and without flash
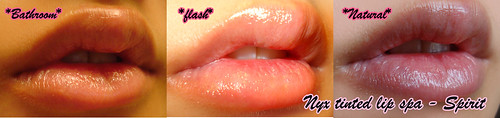
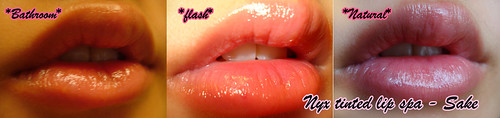
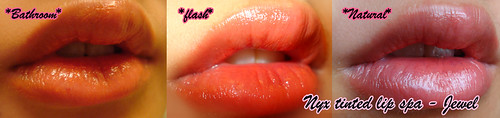
NYX lip spa swatches

** On the lips **

Spirit - a light pink
Spirit

Sake - a mauve pink
Sake

Jewel - a coral pink
Jewel

Vintage - a reddish pink
Vintage

**OMG just noticed the colors almost look exactly alike on the lips! (well on me at least) LOL...well, that's a tinted lip product for you hahaha I promise the colors are actually slightly different though***

Overall
The name itself makes these tinted lip balms seem so luxurious - according the the site, they have been formulated with "Vitamin E and extra moisturizing properties to nourish and condition lips while adding color." They do wrap your lips in a temporary layer of moisture and feel very smooth once applied. There is a strong minty sensation, akin to the feeling you get when you apply a product like "Burt's Bees" lip balm. However, nothing to the point of tingling aka E.L.F. plumping lip glaze. I hate lipstick normally and these were incredibly easy to wear! The only gripe I have with these lip spas is that at the end of the day (with no in-between applications), my lips felt rather dry.

Pros: Affordable ($5.50 a pop on NYX site, $3.75 on cherryculture.com), large selection of pretty colors, feels good on the lips, color noticeable, sturdy & stylish packaging

Cons: Temporary moisturizing effect, may dry out lips if you already are prone to dryness, colors can look similar on lips, Sensitive to heat so don't leave in your car in the middle of the Summer heat!


Rating: (3/5)

At first I was tempted to buy the whole set, but now I am CONTROLLING my spending much better. (At least I like to think...) I was upset that CherryCulture was sold out of the Cococabana color at the time, but in the end, I was pleased with my choices. If you are planning on purchasing these, you should wait for a good sale to come along! Sometimes they can be up to 50% off. Also I would recommend you go with a just a few colors as these are tinted lip products and the color payoff is exactly that of a tint so you really don't need the whole set. I think I prefer my Maybelline Moisture Extreme lipstick over the Lip Spas because they provide more moisture for my lips and don't dry them out as much...however, these are still a good option for ladies who might not suffer as much from dryness.

Although the tinted lip spas didn't end up in my HG of lip products, so far, I have really been impressed with NYX. (which btw, means "Goddess of the Night") It's just a shame they don't sell this line at most drugstores. The color selection is amazing, the quality is impressive, and all at an affordable price! After tossing about 5-6 MAC lipglosses that were past their prime (I should really start throwing out my old makeup more often, for hygenic purposes), I wondered why I was blowing all this money on products that I would have to toss in a year or so. NYX just makes cents. (hahaha sorry, couldn't resist... ;D)

I have purchased some of their Black Label Lipsticks, Round lipsticks, Round lipglosses, eyeshadow palettes and pearl pigment powders which I will reviewing/swatching in future posts!

***

I am so very lucky to have so many gorgeous and sweet followers...thank you all for your support. I plan on giving back again soon in a fun way! :D

***
I hope you ladies had a fabulous week, please go on and enjoy the weekend! :)

Irene

Sunday, June 13, 2010

Maybelline Moisture Extreme Lipstick Swatch Update + Combo falsies

So much has been going on these past few days...busy volunteering and running around doing errands. :P

Still, I have time to squeeze in an update on the Maybelline Moisture Extreme Lipstick swatches from my previous post! Summertime is basically here and although my lips are even more chapped/dry/parched in the winter, it still persists into the summer. *sigh* So many ladies had mentioned how much they loved the color "NUDE BLUSH" but they were all sold out the last time I hauled. So here is my recent review of the color:

In the tube
Nude blush

On my lips!
nude blush

*Complete look*
Wedding ride
Tried out the Tokidoki Luminosa powder here in Kabuki - LOVE! Very subtle but lasting!

This lipstick, like all the other maybelline moisture extreme lippies, felt like lingerie on the lips, so smooth, silky, and comfortable!

Again, to see all colors & swatches, visit my last review here!

Rating: (5/5)

Still lotsa love for this lippie!

***
I my falsies

In order to get the look above, I used two pairs of falsies...as I mentioned in another post, I love falsies since it helps create the appearance of larger eyes. Plus my natural lashes are the usual short, stubby, non-existent variety, so falsies give me a little extra 'oomph'. T_T

Combining falsies can really make your eyes "pop!" - I usually only do this for special occasions like a night out since it is a bit dramatic. :)

Lash love

You can find Ardell's at any drug store and Darkness lashes are sold at Korean markets and online at Daybeauty.com (by the way on special AGAIN - $2.95 for 2 pairs of lashes!!!). The Kma5s are a lot lighter than the other style of Kmas - the band is thinner and more flexible which = optimized comfort!

I love the look of lush lashes! (Older pics, same combo of lashes)

Ardell Kma5s combo

Kma5 + Ardell 109s

***

I went to see Wicked to celebrate my 3-year anniversary with my boyfriend. I had to leave straight from the wedding reception, and didn't have time to change. Had I prepared more, I would have joined in on the fun with "Wicked-themed" attire and makeup! I did enjoy seeing all the theater-goers in their green dresses and pointy hats though. ;)

Wicked

And a post wouldn't be a post without some food pics!!! For my Mom's b-day we had some of the tastiest peking duck + pineapple sweet & sour chicken (HK style!) that I've ever eaten!

Pineapple sweet and sour

Peking duck

*happy sigh*

***

Welcome to all of my beautiful new followers :)

Hope you had a wonderful weekend
(I can't wait until the next weekend already lol)

Saturday, June 12, 2010

Reviews, Hauls & More Mega HK MAC Giveaway!

OMG, major excitement when Susie posted this - Reviews, Hauls & More is hosting a MEGA giveaway with MAC Hello Kitty (Totally LE rare stuff!) - visit her blog now to enter!


Good luck to all!

Tuesday, June 8, 2010

Hawaiian Summer ♥ - Sweet June 2010 scans

**Picture heavy post!!!**

So if you lovely ladies don't already know, I am madly in love with HAWAII . I've been there once in my life, but merely visiting brought me a sense of peace and belonging. The natural beauty of the islands is truly unmatched. The people there are incredibly friendly, the shave ice cannot be beat, and the views will forever imprint your brain with images of true paradise. A trip to Hawaii just leaves you in awe!

203

I was pleasantly surprised to find a nice spread chock-full of Hawaiian beachy goodness in the latest issue of "Sweet"! The beautiful Ms. Nic Nic from "Bang Bang She Shoots" has some scans up as well from this edition and I fully agree that this is one of my favorite Japanese magazines because it appeals to people older than 20. LOL.

The timeless and age-resistant Ayu graces probably her 1,000,000th cover :) She is so flawless it hurts!

001

The spread is titled "Alice in Hawaii" Wish it could be more along the lines of "Irene in Hawaii" LOL

093

Love the Summer vacation getaway clothing - so breezy and comfy!

094

095

096

097

098

100

101

102

103

104

105

126

127

128

129

130

131

132

133

134

135

136

137

138

139

An 'out-takes' photo from the first photo!

202

[mini rant]

Alice must be one of the magazine's models that reappears time and again...I failed to mention this beforehand because I did not want it to desecrate your enjoyment of these fine Hawaiian photos...BUT Alice keeps making this face or doing something with her mouth that MAJORLY irks me! Why the endless assortment of pouts? Did you just down a gallon of lemon juice? Stop taking yourself so seriously - you're in freaking HAWAII!!! They should have picked somebody that had a sunny disposition to match the sunny island feel!

[end rant]

Maybe I'm just jealous...I would probably just be smiling from ear to ear nonstop in every single photo!

*sigh*

I still want a cute mad ruffly bikini since well...ruffles are good for people like me ;)

***

Okay couldn't resist...

Irene in Hawaii

***
Since this post is so Summer-oriented, just wanted to mention that I will be hosting a Summer-love contest shortly with equally lovable prizes! :)

***

To all my lovely readers, enjoy the rest of the week and get some SUN (but don't forget the sunscreen)!

Monday, June 7, 2010

Photoshop Tutorial - Rainbow Gradient Text

If you're like me and you like the asthetic appeal of everything (new customizable templates by blogger HOLLA!) AND you want to sex up your blog AND you happen to own Adobe Photoshop - you're in luck! Sophia had asked me earlier to do a small tutorial on rainbow gradient text ~ I hope this helps! ;)

The below tutorial is for Adobe Photoshop 7.0 though these features are available in other versions as well.

*****

I have mocked up simple text on a black background. You can add text to ANY picture by opening the picture in photoshop, selecting the text tool (the giant "T" on the left hand button bar" and clicking the part of the screen where you would like the desired text. (you can move this later with the move tool, second from the marquee rectangle on the top row on your right!)

Anyway, after you have selected your text with appropriate size/font/style etc., make sure the text tool is selected on your "layers" tab in order to unlock all the customizable tools! (see pink arrow in picture below)

Rainbow Gradient Tutorial 1

*****
Next, go to Layer > Layer Style > Gradient Overlay

Rainbow Gradient Tutorial 2

*****

The following screen should pop up. In order to create your own gradient, click on the gradient itself (pink arrow) followed by the little blue arrow button (blue arrow) and select NEW GRADIENT.

Rainbow Gradient Tutorial 3

*****

Start by adding the colors to your gradient (in my case, rainbow gradient) by selecting the crayon type object (pink arrow). Then click on the "color" button in order to select your own color (blue arrow)

Rainbow Gradient Tutorial 4

*****

Continue selecting different colors of your gradient by clicking right underneath the gradient to create new "crayons" or "stops" for the gradient. (pink arrows and blue star) Everytime you pick a new stop, change the color to see an adjustment in the gradient. You can slide these along the gradient later to adjust the shading to your liking.

Rainbow Gradient Tutorial 5

*****
When you are finished selecting all your colors, name your gradient and select "NEW' button to add this gradient to the pre-set screen (Pink arrow). It should pop up alongside the other gradients! (Blue arrow)

Rainbow Gradient Tutorial 6

*****

Finally, set the direction you want your gradient to 'flow.' (pink arrow) Don't forget to check the "PREVIEW" box so you can see how it'll look in real time before setting the gradient.

Rainbow Gradient Tutorial 7

*****

VOILA!!! Rainbow-y Gradient-y colorful text!

Rainbow Gradient Tutorial 8

*****

BONUS - "Stroke" Function Text Mini-Tutorial

If you want to add some extra "oomph", you can continue applying different 'layer styles' to your text. I really like the STROKE function - it's like an automatic "outline" to your text!

With the text layer selected in your layers tab, select Layer > Layer Styles > STROKE

Rainbow Tutorial extra stroke

Play around with the settings & color for the desired effect! (I changed the red color to black and then increased the size)

Rainbow Tutorial extra stroke options

ALL DONE! Go glam up your text & have some fun!

Rainbow Gradient End


*****

If you have more requests for photoshop tutorials --or any other questions for that matter-- feel free to ask!

*****