
The below tutorial is for Adobe Photoshop 7.0 though these features are available in other versions as well.
*****
I have mocked up simple text on a black background. You can add text to ANY picture by opening the picture in photoshop, selecting the text tool (the giant "T" on the left hand button bar" and clicking the part of the screen where you would like the desired text. (you can move this later with the move tool, second from the marquee rectangle on the top row on your right!)
Anyway, after you have selected your text with appropriate size/font/style etc., make sure the text tool is selected on your "layers" tab in order to unlock all the customizable tools! (see pink arrow in picture below)

*****
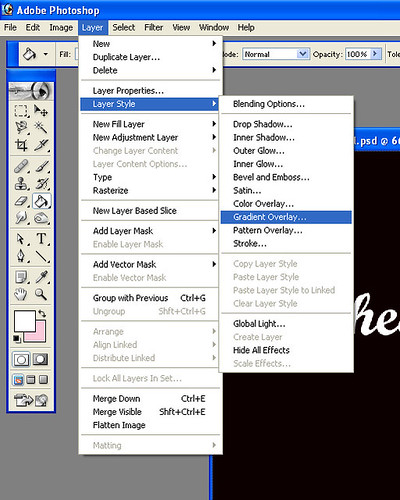
Next, go to Layer > Layer Style > Gradient Overlay
*****
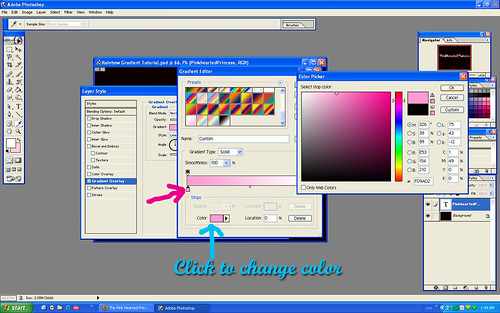
The following screen should pop up. In order to create your own gradient, click on the gradient itself (pink arrow) followed by the little blue arrow button (blue arrow) and select NEW GRADIENT.

*****
Start by adding the colors to your gradient (in my case, rainbow gradient) by selecting the crayon type object (pink arrow). Then click on the "color" button in order to select your own color (blue arrow)
*****
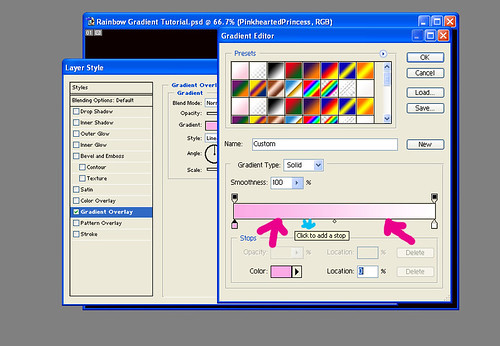
Continue selecting different colors of your gradient by clicking right underneath the gradient to create new "crayons" or "stops" for the gradient. (pink arrows and blue star) Everytime you pick a new stop, change the color to see an adjustment in the gradient. You can slide these along the gradient later to adjust the shading to your liking.
*****
When you are finished selecting all your colors, name your gradient and select "NEW' button to add this gradient to the pre-set screen (Pink arrow). It should pop up alongside the other gradients! (Blue arrow)

*****
Finally, set the direction you want your gradient to 'flow.' (pink arrow) Don't forget to check the "PREVIEW" box so you can see how it'll look in real time before setting the gradient.

*****
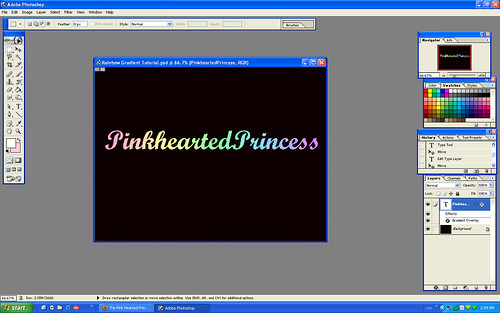
VOILA!!! Rainbow-y Gradient-y colorful text!
*****
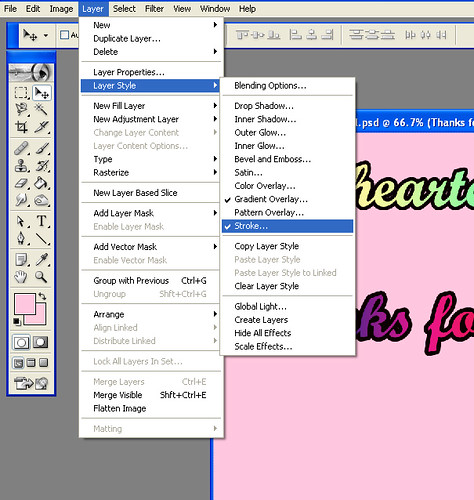
BONUS - "Stroke" Function Text Mini-Tutorial
If you want to add some extra "oomph", you can continue applying different 'layer styles' to your text. I really like the STROKE function - it's like an automatic "outline" to your text!
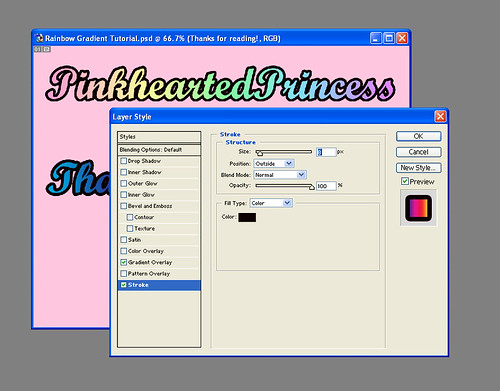
With the text layer selected in your layers tab, select Layer > Layer Styles > STROKE
Play around with the settings & color for the desired effect! (I changed the red color to black and then increased the size)
ALL DONE! Go glam up your text & have some fun!

*****
If you have more requests for photoshop tutorials --or any other questions for that matter-- feel free to ask!
*****
If you have more requests for photoshop tutorials --or any other questions for that matter-- feel free to ask!
*****
13 comments:
awww!!! great! thanks!!! ^__^
i think this will be useful for my future projects... ^__^
biggest project coming: our wedding invites! ^__^
thanks so much!!!
Wow, super cool! The newb in me really appreciates this. =D
Whooooooaaa neato!!! Thanks for posting this Irene! I'm gonna try this when I get home :)
I wish I had photoshop .. I'd spend hours on there. For now it's just Paint for me, unfortuntately. Thanks for this tutorial though. It's always interesting seeing how this stuff is done.
nice tutorial Irene. Photoshop is awesome. I love making graphics
btw you won my jewels of denial giveaway! e mail me and let me know the 3 toe rings you want from their website along with your shipping addy! :)
LOL, I love the new customizable templates too! :P as well as your tutorial! I've always been a little obsessed with PS<3.
Love this post :]... I really like the gradient colors you used in the first part! Soooo pretty <3
great tutorial you photoshop genious! ;) i'm with you on the aesthetics though! so important!
Great Tutorial Hun! :) extremely helpful! :)
Great tutorial! =) Very cute rainbow effect! <3
Thanks for such an easy tutorial!
Super-Duper site! I am Loving it!! Will come back again, Im taking your feed also, Thanks. clipping mask photoshop
Post a Comment